Monday, June 25, 2012

Homemade Cloud Biscuit Cinnamon Rolls

2 cups all purpose flour
1 Tbsp. white sugar
4 tsp. baking powder
1/2 tsp. salt
1/2 cup shortening
1 beaten egg, room temperature
2/3 cup milk, room temperature
2 1/2 Tbsp. melted butter
2/3 cup brown sugar
3 Tbsp. cinnamon
1 cup powdered sugar

Preheat oven to 450 degrees. In a large bowl, sift together the dry ingredients: flour, white sugar, baking powder, and salt. Using either a pastry cutter or a fork, cut in the shortening until the mixture is a course sand looking mixture. Mix the egg and milk together in a measuring glass and add to dry mixture; stir together until combined and a spatula can follow the dough around the bowl.

On a large, generously floured surface, scrape the dough out of the bowl, add some flour to the top and your hands, and gently knead with the heal of your hand about 20 times (or until dough is less sticky). Using a rolling pin, roll the dough out to about an 18 in. by 24 in. rectangle/oval using flour to make sure the dough does not stick to the surface or the rolling pin.

With a pastry brush, evenly distribute the melted butter over the dough surface; cover the surface evenly with the brown sugar and sprinkle with the cinnamon (you may add more sugar and cinnamon if desired). Start from the far side and tightly roll the dough until it is one large log. Using either a sharp or serraded knife, trim the ends off.

Grease an 8x8 pan. Gently cut the dough log in half, then each of those in half, each of those in half, and finally each of those in half so you have 16 individual rolls. Place the rolls in the pan so you have 4 rows of 4 (small pieces in the corners and larger pieces in the middle). Bake 15-20 min. or until the dough starts to brown, the cinnamon sugar filling begins to bubble, and the rolls start to rise from the middle. Let cool for 3 min.

Meanwhile, in a medium bowl, whisk the powdered sugar and 3 Tbsp. water together. Keep adding a Tbsp. of water at a time until a desired glaze (thick or thin; your preference) is reached.

Carefully turn out onto a large plate. Using the same sharp or serraded knife, gently separate/cut each row vertically, then horizontally. Top with the powdered sugar glaze.


*Original recipe courtesy of Helene Meyers and Nancy Scruggs (Paul's Grandmother and Mother)

June 25-July 1

For all of you avid blog followers out there we know you will be disappointed to see that there will be no menu this week; yes, we can hear the gasps and feel the shock from here. There won't be a menu because it is the last week here before we head out East for our vacation, and that means we need to clean out the fridge and eat leftovers so we don't have anything go bad while we're out of town. No menu also means we can't post any new pictures or recipes we are trying or having for the week.

With that news, let's try something new: we want you to look through the blog and see if there are any meals you have been curious about or eyeing ever since we posted them. If you would like to participate you could get some ideas from the pictures at the bottom of the blog (those have pictures but no recipes) or from each of our weekly menu updates (the meals without an asterisk are missing a recipe on the blog).

Once you find something, make a comment below. If you aren't a follower, not a problem, you can still comment; however, it is super easy to be a follower (look at the left side of the blog, find the follower section, and follow the directions after that) and you actually get an email when we update the blog, so we keep you up to date instead of you having to remember to keep track of our blog. For those who follow our menu on facebook, we'll also check the comment section just in case you are still not convinced to become a follower of the blog.

We'll do our best to get up as many recipes as you request. Although, there are some recipes which are going to be kept secret. If we give away ALL of the recipes there won't be anything only we are known for, so don't take it personally if your recipe choice isn't posted. Hope you all have fun with this new blogging experiment!

Tuesday, June 19, 2012

June 18-24

Once again, we had to carry over a recipe from last week's menu because of the busy schedule; however, because we make the menu in advance it works out well if we need to do a carry-over every now and again. Due to this fact, the menu this week isn't completely free of Rachael Ray. We based the rest of the menu on a couple of Cooking Light magazines we acquired from Tim's dad, so thanks to Al for a great menu this week.

There is a mix of different recipes this week: a vegetarian meal, a new venture into souffles for us, seafood, meat, and a new twist on a summer classic sandwich. Hopefully you can find something on here that will influence your summer dinners. If you find a recipe that we didn't post and it is a must have for you, just let us know and we'll do our best to get it up on the blog. Enjoy the summer cooking.

Monday - Grilled Shrimp Scampi
Tuesday - Open-Faced Jalapeno Cheese BLTs with Sweet Potato Fries*
Wednesday - Dinner at Farmhouse
Thursday - Crispy Salmon and Arugula Salad with Carrot-Ginger Vinaigrette
Friday - Potato, Chorizo, and Green Chili Burritos
Saturday - Cheese Souffles with Herb Salad*
Sunday - Italian Meatball Sliders

*Recipe included on the blog

Cheese Souffles with Herb Salad

Souffles
2 tsp. unsalted butter, softened
8 tsp. finely grated parmesan cheese
2 1/2 Tbsp. all-purpose flour
1/8 tsp. ground cayenne pepper
1/8 tsp. freshly grated nutmeg
1/8 tsp. ground black pepper
1/2 cup plus 2 Tbsp. milk
2 Tbsp. dry white wine
1/4 salt
2 oz. Gruyere cheese, shredded
2 large egg yolks
4 large egg whites

Preheat oven to 400 degrees.
To prepare souffles, coat each of 4 (1 cup) souffle dishes evenly with 1/3 tsp. butter. Sprinkle each souffle dish with 2 tsp. parmesan cheese, tilting to coat sides and bottom.
Combine flour, cayenne pepper, nutmeg, and black pepper in a small saucepan over medium heat. Gradually add milk and white wine, stirring with a whisk until smooth. Cook for 4 min. or until mixture is thick and bubbly, stirring constantly. Remove from heat. Add salt and Gruyere cheese; stir until cheese melts. Spoon the mixture into a large bowl and let stand for 5 min.; stir in egg yolks.
Place egg whites in a large bowl; beat with a mixer at high speed until medium peaks form (do not over beat). Gently stir one quarter of egg whites into yolk mixture; gently fold in the remaining egg whites. Gently spoon mixture into prepared dishes. Place dishes on a baking sheet, and place in oven; immediately reduce oven temp. to 375 degrees. Bake souffles for 17 min. or until puffy and golden.

Herb Salad
4 tsp. EVOO
4 tsp. cider vinegar
Salt/Pepper
4 cups arugula
3 cups mixed herbs (whatever you like: basil, parsley, mint, dill, cilantro, etc.)

To prepare salad, combine EVOO, vinegar, and salt & pepper in a large bowl, stirring well with a whisk (salt & pepper more to taste if needed). Add arugula and herbs; toss to coat. Serve alongside souffles.


* Original recipe courtesy of Cooking Light, May 2012, p. 134

Open-Faced Jalapeno Cheese BLTs with Sweet Potato Fries

Sweet Potato Fries
2-3 medium to large sweet potatoes, peeled
2 Tbsp. EVOO
Salt/Pepper
1/4 tsp. cayenne pepper

Preheat oven to 450 degrees. Cut the sweet potatoes into 1/4 in. strips and lay out on a large baking sheet; toss the potato strips with the oil, salt & pepper, and cayenne pepper. Arrange in a single layer on the baking sheet and bake for 30-45 min., turning occasionally until browned and a bit crispy.

BLTs
2-3 Tbsp. pickled jalapenos coarsely chopped
1 Tbsp. grated onion
2 Tbsp. mayonnaise
1 tsp. cider vinegar
1 tsp. pepper
1 cup shredded cheddar cheese
1/3 cup parmesan cheese
8 sliced sourdough bread, toasted
3-4 roma tomatoes
8 center-cut bacon slices, cooked and halved
2 cups arugula

Combine the first 7 ingredients in a large bowl (add more jalapeno, pepper, etc. to taste). Spread some of the cheese mixture on each toasted bread slice; top each with 3-4 tomato slices. Finally, top each sandwich with 2 bacon halves and some of the arugula.


* Original recipe courtesy of Cooking Light, July 2012, p. 60

Monday, June 18, 2012

Garlicy Zucchini and Summer Squash Pizza

1/2 cups EVOO
5 garlic cloves (2 finely chopped, 3 peeled)
1 referigerated pizza dough
1 large zucchini chopped into 1/4 in. cubes
1 large summer squash chopped into 1/4 in cubes
Salt/Pepper
2 cups shredded mozzarella cheese
1 bag arugula

Place the 3 whole garlic cloves in the 1/2 cup EVOO at least 2 hours before you will make anything else (you can do this a day in advance too and just let it sit until you want to use it).

Preheat the oven to 425 degrees. On a well floured surface, roll out the referigerated pizza dough to your desired thickness. Using a pizza cutter, divide the dough into 6 separate pieces; roll the individual pizza squares a bit more, then place on a non-stick cookie sheet. Bake the pizza squares about 5 min. then flip and bake the other side 5 more min. until the dough is bubbling and starting to brown on the edges. Let cool for a few minutes until you can comfortably handle the dough. With a pastry or sillacone brush use the infused EVOO and brush the pizza squares liberally with the oil (reserve about 4 Tbsp.).

Heat a skillet over medium-high heat and add 2 Tbsp. of the reserved garlic EVOO; add the zucchini, summer squash, minced garlic, and salt & pepper and cook until the veggies are just starting to get tender (about 4-5 min.).

Divide the veggies evenly on each of the pizza squares and top each with some mozzarella. Bake until the cheese is melted and starting to bubble (about 6-10 min.). Top each pizza with some arugula and finish off the pizza with a drizzle of the infused EVOO and a pinch of salt & pepper.


* A Paul & Tim original recipe!

Monday, June 11, 2012

June 11-17

This week we are fully embracing summer in our cooking by having a theme in each of our chosen recipes: zucchini and summer squash. Price Chopper was having a 10 for 10 sale on each of them, so that was another reason for finding recipes with the summer vegetables. In looking through our recipes, of course we found that Rachael Ray uses zucchini and summer squash regularly in her summer recipes, so it wasn't hard to come up with the menu.

Some of the recipes are old stand-bys and some are completely new, including a pizza we are coming up with completely on our own. We are also having dinner with some friends and celebrating father's day with both dads this weekend.

Enjoy the recipes, and if you feel inclined to try some let us know how things went. We LOVE to hear when someone gives our recipes a try!

Monday - Sausage-and-Zucchini Rice*
Tuesday - Penne with Grilled Summer Squash and Sweet Corn
Wednesday - Dinner with RyRy and Emily at Lucia's
Thursday - Chili-Beef Stuffed Zucchini*
Friday - Scruggs Father's Day at Rumor's Steakhouse
Saturday - Garlicy Zucchini and Summer Squash Pizza*
Sunday - Dial Father's Day in the afternoon; Grilled Shrimp Scampi

* Recipe included on the blog

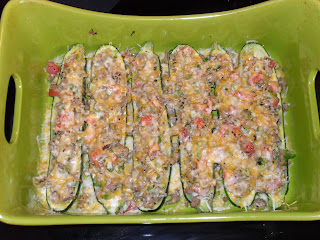
Chili-Beef Stuffed Zucchini

5 zucchini halved lengthwise and the inside carved out with a spoon
2 Tbsp. EVOO
1 large onion finely chopped
2 garlic cloves minced
1 lb. ground beef (we're using turkey)
1 Tbsp. ground cumin
Salt/Pepper
2 tomatoes seeded and chopped
3 jalapenos seeded and finely chopped
1 8 oz. bag mexican style shredded cheese

Preheat oven to 450 degrees. Arrange the zucchini cut side up in 1 or 2 baking dishes with high sides; season the zucchini with some salt & pepper. Add 1/2 cup water to each dish, cover with foil and bake until the zucchini begins to soften (about 15 min.).

Meanwhile, in a medium skillet, heat EVOO over medium-high heat. Add the onion, garlic, and some salt & pepper and cook until softened (about 5 min.). Add the beef, cumin, and some more salt & pepper and cook, breaking up the meat with a potato masher, until browned (about 5 min.). Stir in the tomatoes and jalapenos.

Uncover the baking dishes and pour off the water. Fill each zucchini with some of the beef mixture and top with the cheese. Bake, uncovered, until the cheese has melted (about 10 min.).


*Original recipe courtesy of Everyday with Rachael Ray, May 2009 Menu Planner

Sausage-and-Zucchini Rice

4 Tbsp. unsalted butter
1 large onion finely chopped
2 cloves minced garlic
Salt/Pepper
1 1/2 cups rice
1 32 oz. container (4 cups) chicken broth
1 lb. italian sausage
2 zucchini cut into small cubes
3/4 cup grated parmesan cheese
1/3 cup fresh parsley chopped
1/4 cup pine nuts toasted

In a medium saucepan, melt 2 Tbsp. butter over medium heat. Add the onion, garlic, and some salt & pepper and cook until golden (about 5 min.). Stir in the rice and toast until it becomes shiny and a bit brown on the edges (2-3 min.); stir in 3 cups chicken broth and bring to a boil. Lower the heat, cover and cook, stirring occasionally, until tender (about 20 min.).

Meanwhile, in a large skillet, cook the sausage and some salt & pepper, breaking it up with a potato masher over medium-heat until no loger pink (about 7 min.). Using a slotted spoon, transfer the sausage to a plate. Add the zucchini and some salt & pepper to the skillet and cook until tender (about 4 min.). Return the sausage to the skillet, add the remaining 1 cup chicken broth and cook, stirring until heated through (about 2 min.).

Stir in the rice along with 1/2 cup parmesan, the parsley and the remaining 2 Tbsp. butter. Top with remaining parmesan and the toasted pine nuts.


*Original recipe courtesy of Everyday with Rachael Ray, March 2009 Menu Planner

Wednesday, June 6, 2012

June 4-10

WELL, as you can see by the late-ness of the menu posting, things have gotten completely hectic in our lives. However, that doesn't mean we're letting our meals suffer.

This week we carried over a meal from last week because we went out with friends. It wasn't a problem though, because everything for the meal was still fresh enough to use. If you don't count the carry over meal we once again have nothing from Rachael Ray! See, we can do it without her (almost).

Once again, we may have to be flexible with a few of our meals because we are going to The X Factor auditions here at the Sprint Center this weekend; so, to all you avid blog readers out there, be patient as we try keeping up with the meals and photos - we'll have them up eventually.

Monday - Nara with an elementary school friend of Tim's
Tuesday - Teriyaki Pork Chops with Pineapple and Peppers*
Wednesday - Chili-Rubbed Tilapia with Asparagus and Lemon
Thursday - Beef Enchilada Casserole*
Friday - Fettuccine Alfredo with Bacon*
Saturday - Red Beans and Rice
Sunday - Snack

* Recipe included on the blog

Fettuccine Alfredo with Bacon

1 16 oz. package fettuccine noodles
6-7 slices of bacon
1 onion finely chopped
3 garlic cloves minced
1-2 Tbsp. all-purpose flour
1 cup milk (at room temperature)
2/3 cup grated parmesan cheese
Salt/Pepper
1/2 cup fresh parsley chopped

In a large pot of boiling water, add a handful of salt and the pasta. Cook until the pasta is al dente; reserve 1/3 cup pasta water and drain in a colander.

Meanwhile, heat a skillet over medium-high and cook the bacon until crisp; remove to a paper-towel lined plate. In the bacon grease, add the onion, garlic, and some salt & pepper and cook until the onion is softened (about 5 min.). Start with adding 1 Tbsp. flour to the skillet and whisking for 1 min. - if the mixture is extremely loose, add some more flour until it is no longer looks liquidy. Gradually add the milk while whisking; keep whisking until the mixture has thickened and can coat the back of a wooden spoon without running off (this can take anywhere from 2-7 min. based on how much flour was added). Lower the heat and gradually add the cheese until combined and add some of the reserved cooking water until sauce is desired consistency to your liking; pepper to taste.

Add the hot pasta to the pan and toss well to combine. Add most of the bacon and parsley to the noodles, but reserve some of each for garnishing on top.


*Original recipe courtesy of Cooking Light, January/February 2010, p. 30

Beef Enchilada Casserole

20 6 in. corn tortillas
1 1/2 cups low-sodium beef broth
1 10 oz. can Ro-Tel tomatoes
2 lbs. lean ground beef (we are using ground turkey)
2 Tbsp. EVOO
3-4 onions finely chopped
8-10 garlic cloves finely minced
2 Tbsp. chili powder
1 tsp. ground cumin
3 15 oz. cans tomato sauce
4 cups shredded colby-jack cheese
3 jalapeno chiles seeded and finely minced
1/2 bunch cilantro chopped
1 Tbsp. hot sauce
Salt/Pepper

Adjust the oven rack to the middle position and heat to 450 degrees. Working in batches, toast tortillas either directly on the wire rack in the oven or on a cookie sheet until they bubble and turn brown (4-5 min. per side). Transfer to a plate.

Break up 8 toasted tortillas over a food processor. Add 3/4 cup broth, the whole can of Ro-Tel tomatoes, and a pinch of salt & pepper; process until smooth and transfer to a large bowl. Meanwhile, over medium-high, heat 1 Tbsp. EVOO in a skillet and add 1/3 the onions, the beef, and some salt & pepper; cook until the beef is no longer pink (about 5 min.). Remove with a slotted spoon and transfer to the bowl with the tortilla mixture.

Add the remaining oil, onions, and some salt & pepper to the skillet and cook until softened (about 5 min.). Stir in the garlic, chili powder, and cumin and cook until fragrant (about 30 sec.). Add tomato sauce, remaining broth, and salt & pepper to taste to skillet and simmer until slightly thickened (5-7 min.)

In the large bowl with the tortilla/beef mixture, stir in half of the tomato sauce mixture, 1 1/2 cups cheese, 1 minced jalapeno, 2/3 of the cilantro, and hot sauce. Stir until combined; salt & pepper to taste if needed.

In a large greased 9x13 pan, arrange 6 toasted tortillas on the bottom. Spread the tortilla/beef mixture evenly over the tortillas. Arrange remaining tortillas over filling and top with remaining tomato sauce mixture. Bake until filling is bubbling around the edges (about 30 min.). Take out and evenly sprinkle the top with remaining cheese, minced jalapeno, and cilantro. Return to oven and bake until cheese is bubbly and browned (about 15-20 min.). Let cool 20 min. before cutting and serving.


*Original recipe courtesy of Cook's Country, April/May 2009, p. 19